 Shoopy
 Adding a product in Shoopy
Pick a product type, fill Basic Details and SEO, watch the Readiness checklist, and save the product live on your store.
Adding a product lists a new item on your store. You open Catalog → Products, click Add Product, pick a product type, fill a short form, and save. The form guides you with a live Readiness checklist.
To add variants after the product is live, see Shoopy product variants. For the admin layout, see A tour of the Shoopy admin panel. For what the storefront does with your catalogue, see your online store.
Before you begin
- Sign in at
web.shoopy.in. For details, see Logging in with OTP. - Your role must allow catalogue edits. Owner, Admin, Catalog Manager, Location Admin, Billing Manager, and Marketing Manager can add products.
- New terms? Check the Glossary of Shoopy terms.
Where to find it
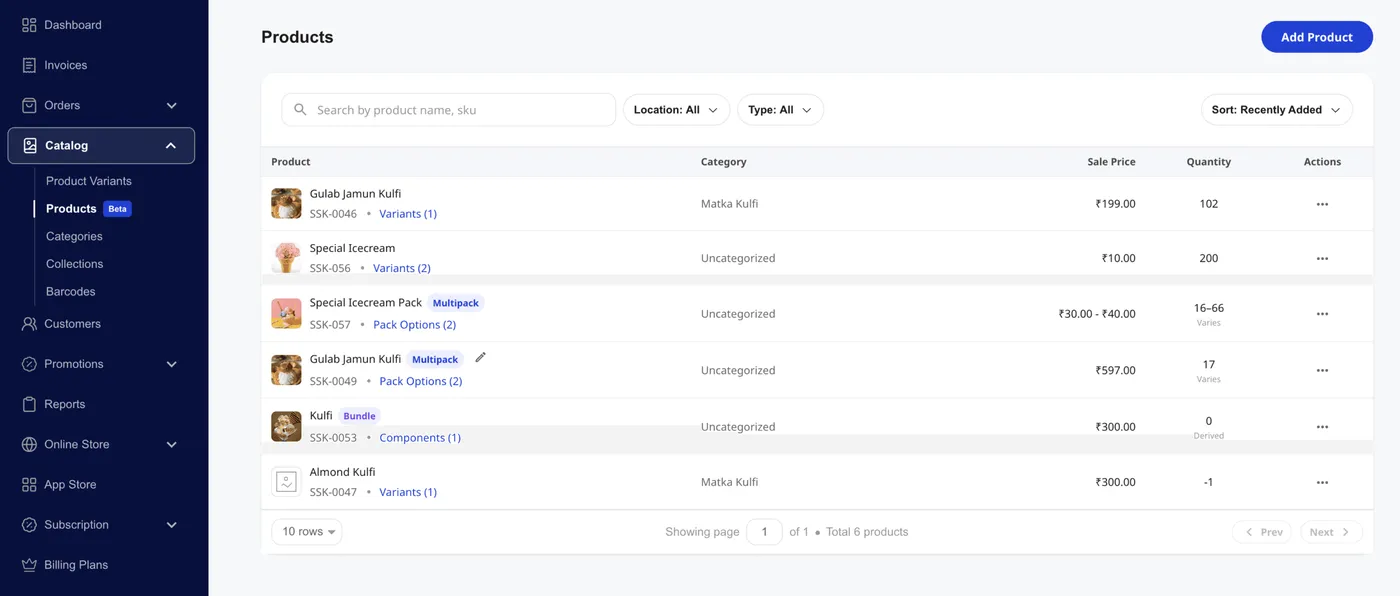
From the sidebar, click Catalog → Products. The product list opens. Click the Add Product button at the top-right, and the form opens on a new screen.
Pick a product type first
The form starts with a Product Type selector. Pick the type that matches your item:
- Simple — A single item, optionally with variants. For example, a tee in three sizes. This is the default and covers most products.
- Bundle / Kit — Multiple different items sold together as one unit. For example, a hamper with three distinct products.
- Multipack — Packs of the same item. For example, a “box of 12” version of a single product.
You can change the type later by editing the product, but picking the right type upfront keeps the catalogue clean.
Layout of the form
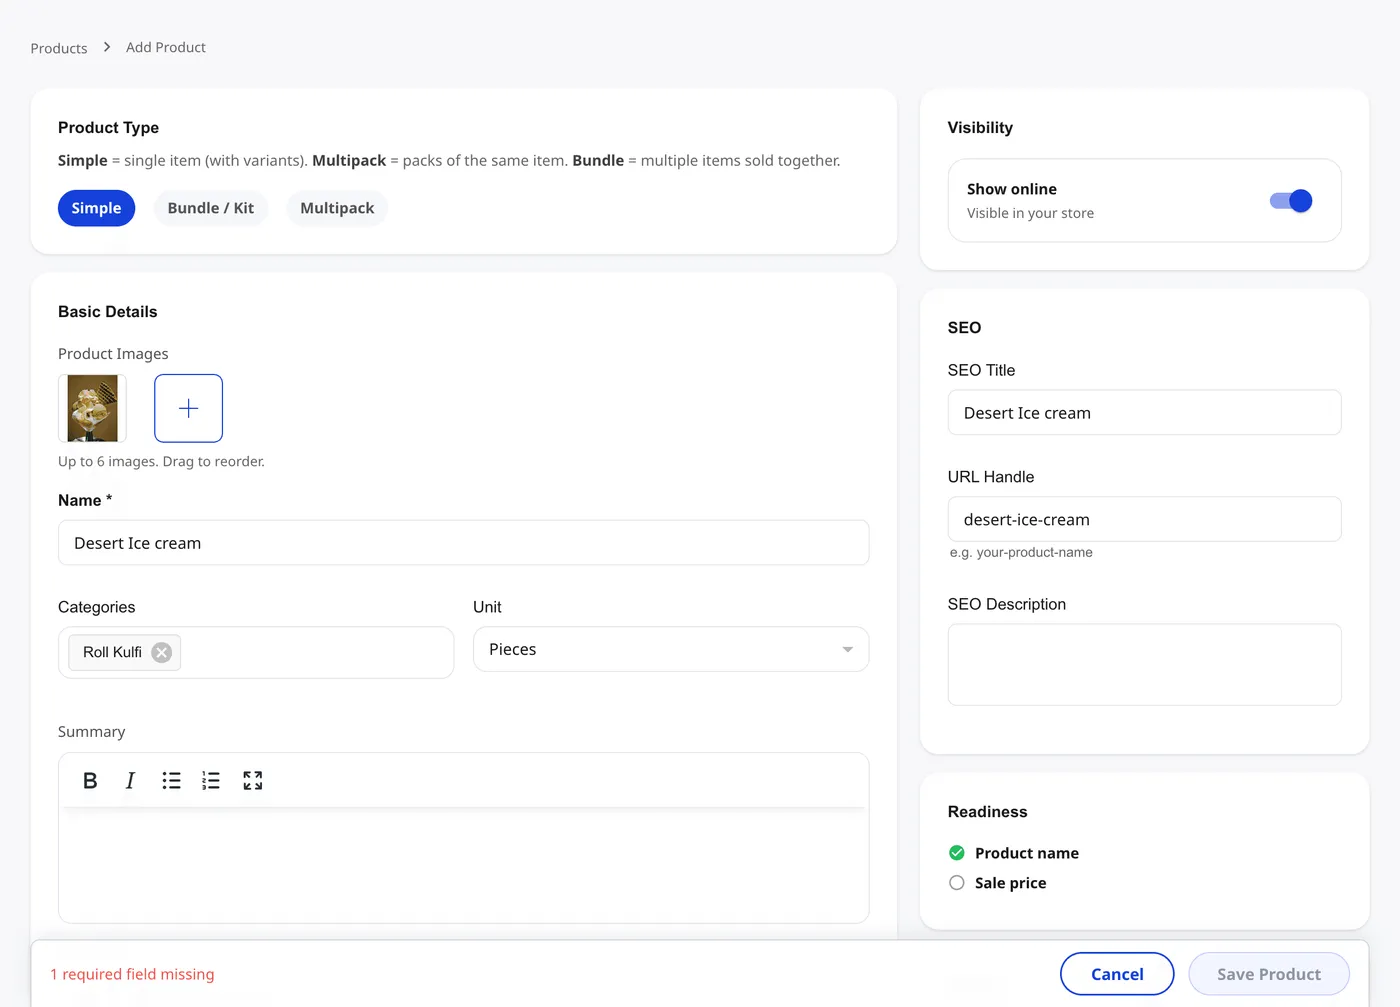
The form uses a two-column layout:
- Left column: Basic Details — Images, Name, Categories, Unit, Summary, and Description.
- Right column: Visibility, SEO, and Readiness — Show-online toggle, SEO fields, and a live checklist of what’s left to fill.
Scroll the left column for the product itself and glance right for status.
Required fields
Only two fields are required:
| Field | Type | Notes |
|---|---|---|
| Name | Text | The display name shoppers see. Marked with an asterisk. |
| Sale Price | Number | The price customers pay. Uses your store currency. |
The Readiness card on the right ticks each item as you fill it. The footer shows “1 required field missing” until all are in, and the Save Product button stays disabled until Readiness is green.
Basic Details
The Basic Details card holds the core information:
- Product Images — Up to 6 images by default; higher plans allow more. Drag thumbnails to reorder. The first image is the main shot.
- Name (required) — Short and searchable. For example, “Gulab Jamun Kulfi”.
- Categories — Click to pick one or more. Selected categories appear as chips.
- Unit — Dropdown of measuring units like Pieces, Kg, or Litre.
- Summary — A short one-or-two-line pitch for the product.
- Description — Full rich-text story. A Generate button can draft it from the Name.
Pricing
Pricing has three related fields:
- Sale Price (required) — What the shopper pays.
- MRP (optional) — List price, shown crossed out. Shoopy enforces MRP ≥ Sale Price.
- Purchase Price (optional) — Your cost price, for margin reports. It is not shown to shoppers.
A Tax-inclusive toggle sits next to Sale Price — flip it if your price already includes tax.
For tax rules and HSN codes, see Pricing, MRP, tax, and HSN in Shoopy.
Inventory and identifiers
These fields are optional but useful:
- Quantity — Stock count for this product.
- Barcode — Scan-ready code for your POS.
- HSN — Tax classification code (India).
- Brand — Helpful for shopper filters and SEO.
- Weight — Used by shipping rules to compute rates.
- Min / Max Quantity — Cap how many a shopper can buy at once.
- Dimensions (L×W×H, cm) — Used by shipping rates.
Some fields appear only if your store settings enable them. If you don’t see Brand or HSN, your store may have them turned off.
Visibility and SEO
The right column holds two small but important cards.
Visibility
- Show online — Toggle on to publish the product on your storefront. Off hides it even after save.
SEO
- SEO Title — The tab title shown by Google. If left blank, Shoopy uses the product name.
- URL Handle — The slug in the product URL. For example,
desert-ice-cream. Shoopy pre-fills this from the Name. - SEO Description — The meta description Google shows in results.
A good SEO Title plus a tight SEO Description lifts your product in search. For a deeper guide, see Product SEO in Shoopy.
The Readiness checklist
The Readiness card on the right is your live pre-save checklist. Each required field ticks green as you fill it:
- ✅ Product name — ticks when you type a Name.
- ○ Sale price — ticks when you set a Sale Price.
Watch this card to know when Save Product will unlock. The form footer says “1 required field missing” until every Readiness item is green.
Save and what happens next
Click Save Product. Shoopy creates the item and returns you to the Products list, where your new product appears at the top with its type badge.
After save, you can:
- Open the product to edit any field.
- Add variants (like size or color) via the variant editor. See Shoopy product variants.
- Clone the product for similar items. See Clone a Shoopy product.
- Toggle Show online from the product page to hide or publish.
Plan-gated fields
A few fields are tied to plan tier:
| Field | Plan required |
|---|---|
| Youtube URL (video) | Basic and above |
| Payment Mode (COD/Prepaid override) | Professional and above |
If you see a “Paid” badge next to a field, your plan doesn’t include it. Upgrade from Account → Plans to unlock it.
Tips
- Pick the product type first. Switching later takes extra clicks.
- Use the Readiness card as your guide — you know exactly what’s missing.
- Set MRP and Sale Price together so shoppers see a clear discount.
- Use short names. For example, “Kulfi Malai 100ml” beats “Our Special Malai Kulfi 100ml Pack of One”.
- Edit the URL Handle for better SEO. Pre-filled slugs work fine, but shorter ones rank cleaner.
Troubleshooting
The Save Product button stays disabled
Check the Readiness card on the right and fill whichever items show ○. Name and Sale Price are always required.
My product isn’t showing on the storefront
The Show online toggle in the Visibility card may be off. Turn it on and save. Newly added products can also take a minute to appear on the live store.
I can’t see fields like Brand or HSN
Your store settings have those fields turned off. Ask your owner to enable them under Settings → Catalog.
I don’t see the Add Product button
Your role may lack catalogue permission. Ask the store owner to assign a catalogue-capable role under Online Store → Users & Roles.
I picked the wrong product type
Open the product and switch the type from the edit view. Some type switches (e.g., Simple → Bundle) may ask you to re-map details, so pick carefully the first time.